Search This Blog

Thursday, March 29, 2012

Carrot, Date, Currant and Coconut Bread

It's been really hard for me to determine what to do with the carrots I have. I didn't want to just make some candied carrots as a side.
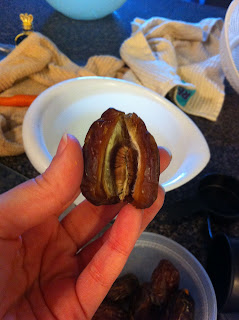
It hit me that I don't recall ever making carrot cake, though I love it. Instead of going for a full-on cake though, I thought I'd try a loaf. I added some Medjool dates that I had delivered to my house, along with some currants and coconut flakes. 

What you'll need:
1 cup of shredded carrots (about 1/3 pound, or 3 large carrots)
1/3 cup Medjool dates, pitted and chopped
1/3 cup Zante currants
1/3 cup shredded coconut
warm water
2 cups flour
3/4 cup sugar
3 eggs
1 tablespoon baking powder
1 1/2 teaspoons cinnamon
3 tablespoons canola oil
canola spray

For gluten-free people, I found a similar recipe on Whole Foods' website for carrot and date muffins that uses a blend of almond and either amaranth or millet flour. I'd imagine that would work with this recipe too, 1/2 a cup of almond flour and 1/2 a cup of either amaranth or millet. 

Preheat your oven to 350 degrees. 

First, pit and chop the dates. a cut down the middle with a knife should let you peel the date back from the pit. 


Add the chopped dates to a bowl with the currants. Cover them with warm water to help reconstitute the dried fruit. 

Then shred up your carrots. I did it using a plain old grater.


Crack your eggs in a bowl. Adding eggs first will help if you accidentally get a piece of shell in there. Then add the canola oil and carrots. 


In a larger bowl, add the flour, sugar, baking powder and cinnamon. Blend until all ingredients are thoroughly mixed. Then add the coconut and blend again. 

Then add the ingredients from the carrot bowl into the dry ingredient bowl. Drain the dates and currants and add them to the bowl as well. Blend all the ingredients until you can no longer see any white flour and everything is evenly incorporated.

Then I sprayed a 9-inch bread pan with canola oil and poured the very dense mixture into it. I baked it for and hour, when I could pull out a toothpick cleanly.


Turns out, the dates are actually the stars of this bread, not the carrots. They're so sweet and add a lot of texture to the dish too. It's pretty dense, like it was as a batter. Perhaps if I wanted to lighten it up next time I'd add more oil or some apple sauce.

But the great thing about this bread is it is the perfect amount of sweet to be either a breakfast toast with some butter on it or a dessert by icing it with cream cheese frosting.


Wednesday, March 28, 2012

Apple and Pear Tart

After eating a few of the gala apples and d'anjou pears in my latest grocery shipment, I decided that these crunchy but somewhat blander varieties of fruit might make better for baking than eating. I much prefer eating fuji apples and bosc pears, particularly when the pears get a touch overripe.

I've made plenty of pies in my life, but never a blend of fruits, and I figured this was a good chance to test this out. I also have never made a pie to look like a traditional French tart, with thin slices of fruit standing up throughout the baking dish.

I put all these concepts together, with a few twists, to make a rustic looking apple and pear tart. What you'll need:

flour
shortening
cold water
two gala apples
two d'anjou pears
sugar
cinnamon
nutmeg
butter

Preheat your oven to 425 degrees. I had an 8-inch pie tin, which I sprayed with canola oil and lightly coated in flour.

Peel both apples and pears and cut the fruit away from the core. Discard the peels and cores, and then cut both the apples and pears into long, thin slices. Place these slices in a bowl and add about 3 tablespoons of flour, 1/2 cup of sugar, 1/4 teaspoon of cinnamon and 1/4 teaspoon of nutmeg.


It is important you do this step before making the dough, because the longer a dough sits, the more dried out it gets, and the more difficult it will be to work with.

Now for the dough: Typically, tarts are made with puff pastry, but I figured an old-fashioned, U.S.-style pie crust would do the trick. I used my mother's (and her mother's, and likely her mother's) recipe.

Mix 1 cup of flour with 1/3 cup of shortening. I like to blend the two with a fork. Small crumbles of dough should begin to form when they're fully incorporated. Then slowly add cold water, typically about 2-3 tablespoons, until a dough begins to form. Now, a lot of things can factor into how much water you need, like humidity, so if you think you need more, you probably do, and vice versa. The goal is to make one cohesive mound of dough, not a flaky bowl of flour. I add about a tablespoon at a time until I'm satisfied.


Generously flour your tabletop. There is practically no such thing as too much flour in this situation. If your tabletop looks like the final scene in "Scarface," only then have you gone too far. Also coat your rolling pin.

Take the dough out of the mixing bowl and place on your floured surface. With your hands coated in flour (and rings removed), press this dough gently into a mound. Then, I like to perform a move that looks a little like I'm giving my dough CPR. Place your palms one on top of the other, much like CPR, and press different parts of this mound of dough out into a circular shape. This is a little trick I do to ensure that when I roll out the dough, it forms into a circle.

Take the rolling pin and evenly roll out this dough in all directions. If you're not sure how big to make the circle or if parts aren't stretched out enough, simply turn your pie tin upside down over the layer to get a good idea.

Now the fun part: Picking up the dough, and putting it into the pie tin.

This is my mother's trick: Pick up one edge of the dough and roll it onto the rolling pin. Now continue to roll the pin, picking up dough as you go. Once you can lift the entire dough this way, unroll it into the pie tin. It's a scary thing the first time you do it, but you'll get the hang of it. We're making this dish look rustic, so if it breaks, just pick it up and press it back together in the tin, no apologies! Never scrap your dough and try to start over. This overworks the dough, and you will never get it back to its original elasticity. Make a few fork impressions in the bottom of the dough.


Fill the crust with the pear and apple filling, stacking the fruits so they stand upright in the tin.


Dot the top of the filled crust with butter. Why? Because it's delicious — that's why.


I wanted this to look a little rough around the edges, so I did exactly that. I took the overlapping pie crust and just folded it back toward the center, leaving about a 4-inch-diameter hole in the center of the pie. Feel free to cut the excess crust and use a fork or your fingers to make a fancier looking edge. Make sure if you opt to cover the entire top with crust to leave holes so the pie doesn't puff up much taller than the filling.

Fun fact: Apparently the only real difference between a pie and a tart is if there is only a bottom crust. This one has a big overarching bottom crust, so perhaps this is somewhere in between technically.

I baked this in the oven at 425 for 50 minutes. I kept an eye on it, and about 35 minutes in, I covered the center with aluminum foil, because it was starting to get too brown. Do the same to any part of your pie you feel is in danger of burning.


It turned out great. The slices of apple feel very familiar, but then a slice of pear will come out of nowhere and wake up your tongue. One of my pears was particularly juicy, and slices of it make the whole pie come alive. Another dessert success for this blog!


Monday, March 26, 2012

Cooling Down With Kiwi Sorbet

In my latest grocery shipment were three little kiwis, a fruit I've always liked. Despite its seed-filled texture, I like the kiwi's sweet but unique flavor. My little fruit lesson of the day: Kiwis are actually called kiwifruit, their full name. They're also known as Chinese gooseberry, but were named kiwis in the U.S. after their very cute avian counterpart.

After watching a recent episode of "Chopped" with one of my friends, I decided to copycat an idea and make kiwi sorbet. It was so easy, and I didn't need an ice cream maker.

What you'll need:

3 kiwis (they can be a few days away from ripe)
water
sugar
liquor
lemon juice
powdered ginger

This recipe made about a cup and a half of sorbet, so multiply it to make more.

In a saucepan, add 1/2 cup of water and 3/8 of a cup of sugar (I just put in 1/4 cup and then half of that size).


Simmer until the sugar dissolves and then lower the heat for about two minutes. You'll know you're doing the right thing by using a whisk to mix the simple syrup. If a bead or two forms on the whisk when you take it out, you're doing the right thing. Wait for the simple syrup to cool. I just put it in the fridge away from other items.


Then I halved the kiwis and spooned their contents into my little food processor and pulsed it around a few times. Then I added lemon juice and, the best part, liquor! It helps keep the sorbet from turning into a giant ice cube, since freezing liquor is basically impossible using standard kitchen freezers. I happened to have some, ridiculous I admit, blue raspberry vodka in my fridge. (As a Florida Gator, this vodka is key to doing orange- and blue-themed shots during football games.)

I added about a teaspoon of lemon juice and a tablespoon of vodka. I think a sweeter alcohol, like rum, would also work well. I'd advice against anything with a strong flavor, like gin. Just think of what alcohol you like in sweeter drinks and use it.


Then I added the cooled syrup to the mixture, about a teaspoon of ginger powder to add a more balance to the sweet treat, and pulsed it around a few more times. Place the mixture in a metal bowl, sealed tight with either a cover or a bunch of plastic wrap for a few hours.

I took the mixture out for about 10 minutes before serving it to my friends, who all seemed to highly approve. It was definitely something I'll make again. So easy and so mouthwateringly good. This would make an excellent summer barbecue cool dessert, and your friends will think you're some kind of culinary genius for making your own sorbet.


Squished Squash

I may have just prepared butternut squash in the best way I've ever had it. Pretty exciting stuff.

I've never been a big fan of butternut squash soups. I think they're too much like the pureed pumpkin you get inside of pies. There's something about that sweetness, especially coupled with that monotonous texture, I just don't get.

I'm in general not a huge gourd fan. They're edible, but I don't spend all summer dreaming of pumpkin cookies in the fall. I ultimately decided to treat my butternut squash like my true favorite orange vegetable: sweet potato. I added a twist to the recipe by spicing it up a bit with some powdered ginger.

Much like sweet potatoes and pumpkins, butternut squash are extremely dense and, therefore, difficult to cut up raw. I've seen recipes where you can just grill butternut squash after cubing it, but that seemed like a task my knife set was not up for.

To soften up a butternut squash for use in a recipe, simply cut it in half and then take out the seeds and strands, just like a pumpkin.


Then I baked the squash, insides down, in a baking tray with some water to add some steam to the process. It took about an hour at 350 for the most center part of the halves to be soft to a fork's touch. Look for the same qualities you look for in a done baked potato.

For the recipe, you'll need:

butternut squash mash
butter (or butter substitute, I used SmartBalance with added Omega-3s)
salt
pepper
ginger
maple syrup

I took the cooked butternut squash halves and scooped out the innards into a bowl. Then I added the butter, or in this case a substitute. I did this all earlier in the day for preparation for dinner later on in the night.

When it came to reheating the mash, I put it in a pan sprayed with some canola oil just to ensure it didn't stick if it overheated. Then I added about a tablespoon of maple syrup, a teaspoon of ginger, and salt and pepper to taste.

The result was delicious, sweet but spicy because of the ginger. It would make a fantastic addition to any Thanksgiving or fall dinner. I'm glad to add another vegetable to my cooking repertoire.


Tuesday, March 20, 2012

My Next Delivery of Produce

Just a quick update to let you know what's coming in my next shipment from Washington's Green Grocer.  In this week's box, I encounter another long-term challenging vegetable of mine, butternut squash.

What's in my box:
butternut squash
green beans
spinach
zucchini
Bibb lettuce
carrots
seedless cucumbers
Ruby Red grapefruit
Gala apples
D'anjou pears
Kiwi

Butternut squash and I do not get along. I've tried butternut squash soup a million times and am always underwhelmed. I'll just have to get creative! If you have any ideas for how to cook this squash in a more savory fashion, let me know.

A Family Tradition With a Spin

I spent St. Patrick's Day this year with my friend who just moved from Philly to Nashville, so I didn't do any of the cooking I normally do.

It's been years since I did the full-on corned beef and cabbage dish that my family does to celebrate our Irish-American heritage, but I do typically make Irish soda bread. A very dry peasant food, the bread consists of flour (no yeast, so very easy), buttermilk, baking powder, salt, caraway seeds and raisins. The caraway seeds, of course, give the bread a flavor reminiscent of seeded rye bread, but this bread is very dense and texturally worlds apart from rye.

In truth, this bread is best toasted with some butter or jam to help get it down. The raisins help in this department ever so slightly, moistening it a big. I admit these two flavors are a bit of an acquired taste together, so while this might not be everyone's favorite dish, I decided to add some caraway seeds and currants to some leftover cabbage to make a side dish with a lot of personality. What you'll need:

green cabbage
canola oil
butter
caraway seeds
currants
water

I put some oil and butter in the pan and let them heat to the point where when you put the cabbage in the pan, it sizzles. When I washed the cabbage, I dried it off with a paper towel so when I added the cabbage to the oil it wasn't too wet crisp up.

Then I let the cabbage cook until fairly soft. I added about a teaspoon of caraway seeds and about a tablespoon of currants. Caraway seeds are very potent, so be careful not to dump away when adding them.

Then I raised the heat and added some water to the pan to help along the cabbage's wilting process. It also helps reconstitute dry fruit, like currants. Like a lot of my cooking seems to go, I just happened to have currants and not raisins in my house, so that's what I used. Zante currants are just a variety of grape, anyhow. They're just usually used in Middle Eastern foods. My mother made Irish soda bread one year with dried cranberries, so you can experiment with that too, if they are your preferred dried fruit.

I let the water cook off and had my side dish.


It's always hard to eat someone else's family's food, and equally it's hard to express the comfort when you taste those flavors you've eaten your whole life. For me, this dish was like remembering a dream. You're familiar with it, but you know you've never really experienced it before. Think of what those tried and true flavors are for you, turn them on their head, and you might surprise yourself with what you come up with. 

A Classic: French Onion Soup

I thought I'd build on the caramelized onion skills I developed making the topping for my portobello mushroom burger and make a serious classic: French onion soup.

This was easy, delicious and tasted like the million other times I've had it out at restaurants.

What you'll need:

an onion
olive oil
butter
salt (optional)
sugar (optional)
red wine
beef bouillon (enough to make two cups)
garlic powder
cracked pepper
dried sage
old bread
blue cheese (my little spin on things, since that's what I had around)

I did exactly what I did in my previous entry to make the onions brown. I put oil and butter in a pan at medium heat, added the onions and stirred occasionally for the next 30 minutes. I added salt and sugar to help along the caramelization, but that is optional, and I'm sure many people wouldn't feel the need to add salt to a soup.

When the onions were ready, I added some old red wine I had on hand. Sherry is the traditional wine for French onion soup, but my old shiraz did the trick to give the soup that depth of flavor. After the wine burned off a bit, I added two cups of water and my bouillon. If you have homemade or store-bought beef stock around, go ahead and use that. I was cooking a little on the fly today with whatever I had in my fridge. I'm anticipating another Washington's Green Grocer shipment Thursday and didn't want to go shopping.

Then I cracked in enough black pepper to balance the soup's sweetness from the onions, probably about six cracks. Then I added about three or four shakes of garlic powder and about a half a teaspoon of sage. The sage really gave it an earthiness and added to the pepper's balance. It's not my favorite spice, so play with adding more if it's one of your mainstays.


I took some pretty old bread I had and broke it up in the bottom of a soup bowl with some leftover blue cheese crumbles. If you have oven-safe bowls, you can put some cheese, like Swiss, on top and broil the cheese to a brown, but I actually really liked this lower calorie alternative.

It tasted amazing, and I guarantee you will make this again and again.